![]()
Deployment
How to deploy the Electric sync engine, with links to integration docs for specific platforms like Supabase, Neon, Render and AWS.
Electric Cloud – the simplest way to use Electric
The simplest way to use Electric is via the Electric Cloud, which is a simple, scalable, low-cost, managed Electric hosting service.
The ingredients of a successful deployment
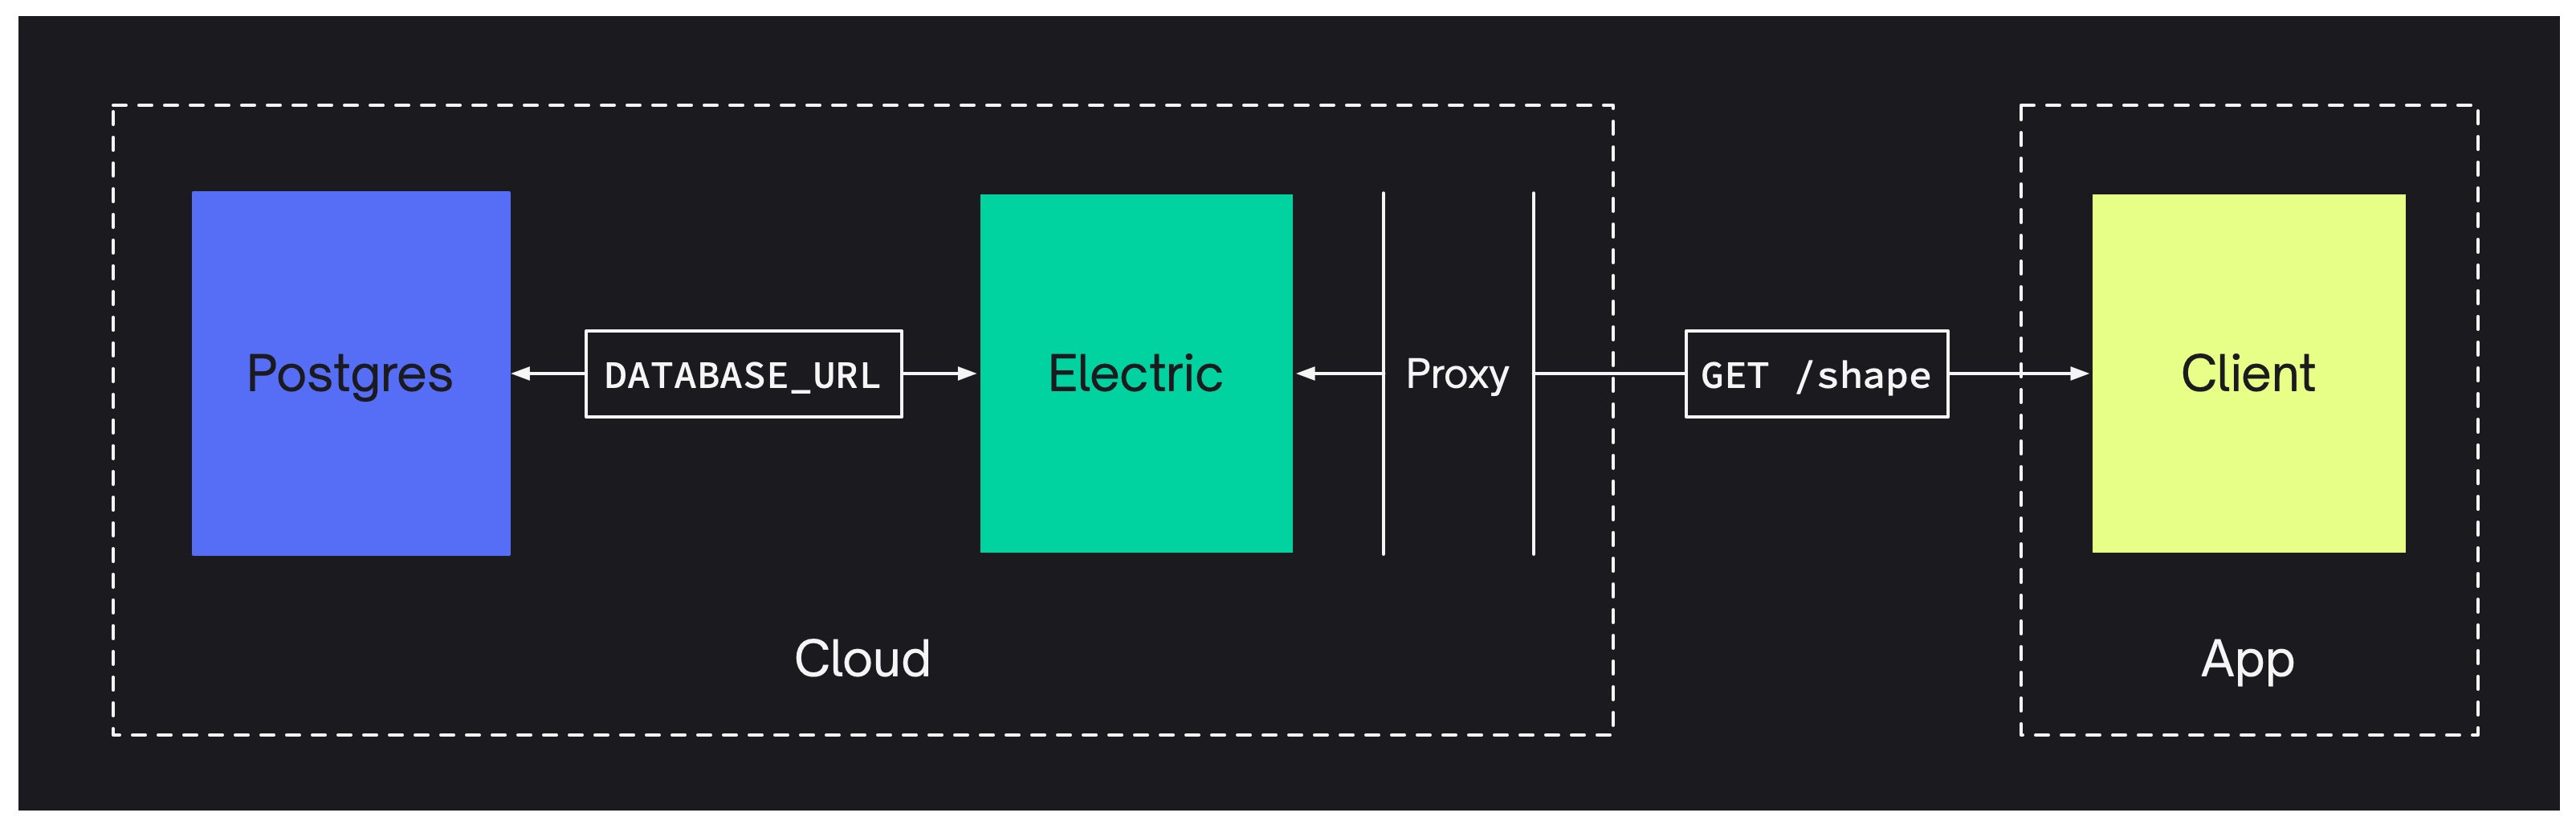
An Electric deployment has three main components. Your Postgres database, the Electric sync service and your app.
Electric connects to your Postgres using a DATABASE_URL. Your app connects to Electric over HTTP, usually using a Client library.
As a result, there are three ingredients to a successful Electric deployment:
- you need to be running a Postgres database
- you need to run and connect the Electric sync service
- you need your app/client to connect to Electric over HTTP
Proxying requests to Electric
You also often want to proxy requests to Electric through your API, or other proxy. For example, to implement auth and/or caching. In these cases, you'll also need to deploy your API and/or proxy layer in front of Electric.
Note also that, when running Electric behind a CDN, you may want your proxy in front of the CDN. This is where primitives like edge functions and edge workers can be very useful.
Securing data access
By default, Electric exposes public access to the contents of your database. You generally don't want to expose the contents of your database, so you need to lock down access to the Electric HTTP API.
See the Security guide for information.
1. Running Postgres
You can use any standard Postgres, version 14 and above.
This includes Postgres you host yourself, or Postgres hosted by managed database hosting providers, including:
Postgres must have logical replication enabled. You also need to connect as a database role that has the REPLICATION attribute.
Data model compatibility
Electric is compatible with any Postgres data model.
Electric will work as a drop on to any existing data model. There are no limitations on the database features, data types or extensions you can use.
Connecting to Postgres
You connect to Postgres using a DATABASE_URL env var. This connection string contains your user credentials and an sslmode parameter.
You usually want to connect directly to Postgres and not via a connection pool. This is because Electric uses logical replication and most connection poolers don't support it. (pgBouncer does support logical replication, as of version 1.23 so this may change in future).
You can optionally provide a separate ELECTRIC_POOLED_DATABASE_URL env var, which can use a pooler and will be used for all queries other than replication.
To force Electric to verify the database server's certificate when connecting to it using TLS, set the ELECTRIC_DATABASE_CA_CERTIFICATE_FILE config option.
Troubleshooting common errors
If you get a TCP connection error saying non-existing domain - :nxdomain or network is unreachable - :enetunreach then you may need to connect using IPv6. You can enable this by setting ELECTRIC_DATABASE_USE_IPV6=true.
If you get a TCP connection timeout error then make sure you're connecting directly to Postgres and not via a connection pool. For example, when using Supabase you need to untick their "Use connection pooling" option on the database settings page.
If you're using IPv6 with Docker, then assuming the machine you're running Electric on has IPv6 connectivity, you may also need to enable IPv6 for the Docker daemon. You can do this by defining an IPv6-capable network) in your Compose file and then adding the networks key to the Electric service definition.
Database resources
Electric creates a logical replication publication and replication slot inside Postgres. These are called electric_publication_default and electric_slot_default by default. You can configure the name suffix using the ELECTRIC_REPLICATION_STREAM_ID env var.
If the database role that Electric connects to Postgres as doesn't have the required privileges to create or update the publication, Electric will check that the publication exists in the database and that it is in the right state, meaning that any table for which a shape request is created must have been added to the publication by hand, in advance. This behaviour can also be enforced with the ELECTRIC_MANUAL_TABLE_PUBLISHING config option.
When running, Electric also keeps a pool of active database connections open. The size of this pool defaults to 20 and can be configured using ELECTRIC_DB_POOL_SIZE.
Cleaning up resources
If you decide to stop using Electric with a given Postgres database or switch to a different database but keep the old one around, make sure to clean up both the publication and the replication slot.
See this troubleshooting advice for details.
2. Running Electric
The Electric sync engine is an Elixir web service, packaged using Docker.
You can deploy it anywhere you can run a container with a filesystem and exposed HTTP port. This includes cloud and application hosting platforms like:
Docker container
Images are deployed to Docker Hub at electricsql/electric.
Optimizing for disk
Electric caches Shape logs and metadata on the filesystem. Your Electric host must provide a persistent filesystem. Ideally this should be large, fast and locally mounted, such as a NVMe SSD. If you're configuring a machine and you want to optimise it for Electric, the factors to optimise for, in order of important, are:
- disk speed — low latency, high throughput reads and writes
- memory
- CPU
For example, on AWS, Storage Optimized instances such as the i3en.large, or on Hetzner the SX-line of dedicated servers would both be great choices.
Configuring storage
The path to Electric's persistent storage can be configured via the ELECTRIC_STORAGE_DIR environment variable, e.g. ELECTRIC_STORAGE_DIR=/var/lib/electric/persistent. Electric will create the directory at that path if it doesn't exist yet. However, you need to make sure that the OS user that Electric is running as has the necessary permissions in the parent directory.
The file system location configured via ELECTRIC_STORAGE_DIR and the data Electric stores there must survive sync service's restarts. For example, when using Kubernetes, you'll want to create a persistent volume and attach it to your Electric deployment.
Clear one, clear the other
The persistent state that Electric maintains in Postgres (via the logical replication publication and replication slot) must stay in sync with the shape data cached on disk by Electric.
If you change the value of ELECTRIC_STORAGE_DIR or switch to a different DATABASE_URL at any point, you must clean up the other location by hand, whether it's removing a directory tree on disk or dropping the replication slot and publication in Postgres.
How much storage space?
Electric trades storage for low memory use and fast sync. How much storage you need is highly application dependent. We encourage you to test with your own workload.
We plan to implement compaction and other features to limit and optimise storage use, such as garbage collecting LRU shapes.
HTTP port
Electric provides an HTTP API exposed on a configurable ELECTRIC_PORT. You should make sure this is exposed to the Internet.
Health checks
Electric provides a health check endpoint at /v1/health that can be used for liveness and readiness probes. This endpoint does not require authentication, so it works even when ELECTRIC_SECRET is set.
The endpoint returns a JSON response with a status field:
| HTTP Status | Response | Meaning |
|---|---|---|
200 | {"status": "active"} | Electric is fully operational and ready to serve requests |
202 | {"status": "waiting"} | Electric is waiting to acquire the replication lock |
202 | {"status": "starting"} | Electric is starting up and establishing connections |
For liveness probes, any response (200 or 202) indicates the service is alive.
For readiness probes, you should check for a 200 status code to ensure Electric is fully ready to handle shape requests.
Example health check using curl:
curl http://localhost:3000/v1/health
# {"status":"active"}
Kubernetes probes
When deploying Electric on Kubernetes, note that standard httpGet probes consider any 2xx response as success. This means an httpGet readiness probe would incorrectly mark the pod as ready when Electric returns 202 (still starting up).
For liveness probes, httpGet works fine since any response indicates the service is alive:
livenessProbe:
  httpGet:
    path: /v1/health
    port: 3000
  initialDelaySeconds: 10
  periodSeconds: 10
  timeoutSeconds: 2
For readiness probes, use an exec probe to check for exactly HTTP 200. The Electric container includes curl:
readinessProbe:
  exec:
    command:
      - sh
      - -c
      - |
        test "$(curl -so /dev/null -w '%{http_code}' http://localhost:3000/v1/health)" = "200"
  initialDelaySeconds: 5
  periodSeconds: 10
  timeoutSeconds: 2
  failureThreshold: 3
This ensures the pod is only marked ready when Electric is fully operational and ready to serve shape requests.
Rolling upgrades need different readiness probes
If you are performing rolling deployments with maxSurge: 1, the exec probe above will cause a deadlock — the new pod can never return 200 while the old pod holds the replication lock. Use an httpGet readiness probe instead, which accepts any 2xx. See the Upgrading guide for details.
Observability
Electric supports OpenTelemetry for exporting traces, with built-in support for Honeycomb.io. Metrics are also available in StatsD and Prometheus formats.
See the Telemetry reference for configuration details.
Caching proxy
Electric is designed to run behind a caching proxy, such as Nginx, Caddy, Varnish or a CDN like Cloudflare or Fastly. You don't have to run a proxy in front of Electric but you will benefit from radically better performance if you do.
See the Caching section of the HTTP API docs for more information.
Upgrading
If you're running Electric behind an orchestrator that performs rolling updates (e.g., Kubernetes, AWS ECS), see the Upgrading guide for strategies to minimize disruption when deploying new versions.
3. Connecting your app
You can then connect your app to Electric over HTTP. Typically you use a Client library and configure the URL in the constructor, e.g.:
const stream = new ShapeStream({
  url: `https://your-electric-service.example.com/v1/shape`,
  params: {
    table: `foo`,
  },
})
const shape = new Shape(stream)
You can connect to Electric from any language/environment that speaks HTTP. See the HTTP API and Client docs for more information.